Favorite brunch & gelato spots in Prague

04 September 2016

Apart from being a stunning city, Prague was also a treat for our taste buds. Honestly I’m not such a fan of the traditional Czech cuisine – read goulash, roast pork and fried schnitzels. So before we left I did a little internet research and listed some lunch recommendations of locals and TripAdvisor/Zomato enthusiasts. I actually always do this before going on holiday because you know, food is important. We also stumbled upon some really great gelaterias which I included in this mini-guide. 

Breakfast/Lunch

1. Sweet & Pepper Days


I’d found pictures of Sweet & Pepper Days online in which a blue bike in the shop’s interior caught my eye. Cute bikes being one of my weaknesses, I decided we had to check the place out. Of course when we got there, there was no bike to be seen but we did enjoy a really nice breakfast. I was gonna go with the full English breakfast until the waiter told me about their pancakes and I was immediately sold. They came with strawberries and coconut cream, absolute heaven! Next to breakfast they also serve a wide range of burgers, hotdogs and pasta. The menu changes weekly so be sure to have a look at their website.

LOCATION? Anglická 19 in Vinohrady 
HOW TO GET THERE? Take metro line A to Náměstí Míru, it’s just a 10 minute walk from there! 

2. Dish


Rens and I are great burger fans so imagine our excitement when we found Dish at a stone’s throw away from our hotel. The place was crowded but we were lucky to secure a free spot on the terrace. I opted for a burger with goat’s cheese, sundried tomatoes and fig mayonnaise with a side of honey-mustard coleslaw and typing this is making my mouth water again. It was seriously one of the best burgers I’ve ever had and trust me, I’ve tasted a few. Rens was also pretty satisfied with his classic Dish burger with cheddar cheese, bacon and confited garlic aioli. Burgeristas - if that’s not a word, it should be - you know where to go!

LOCATION? Římská 29 in Vinohrady 
HOW TO GET THERE? Take metro line A to Náměstí Míru, it’s just a 5 minute walk from there!

3. Café Zahorsky


Café Zahorsky is a great place to get some breakfast before heading to Prague Castle since the bistro slash bakery is just a metro stop away. Rens ordered pancakes with raspberry sauce and sour cream, while I tasted my first eggs benedict (and loved them!). I wish I could’ve tried more of their options like yoghurt with muesli and fresh fruits or their homemade croissants with marmalade. Zahorsky’s artsy interior with big unevenly hung lights and a colorful plate printed wallpaper makes it a spot you won’t soon forget. 

LOCATION? Eliášova 1 in Dejvice 
HOW TO GET THERE? Take metro line A to Hradčanská, it’s just a 5 minute walk from there! 


Gelaterias

1. Puro Gelato


Puro Gelato, the place where not just the gelato but the staff puts a smile on your face. They have a really cute shop near the riverside close to Vyšehrad. I was immediately drawn to the cute red tables and chairs on the terrace. Both the cheesecake and walnut flavors I picked were delightful.

LOCATION? Na Hrobci 410 in Nové Město
HOW TO GET THERE? Take tram 17 to Výtoň 
 

2. Angelato


Angelato is probably the best known gelateria in Prague. There are actually two Angelato shops, both at different sides of the Vltava river. One's located near the Old Town Square, while you can also enjoy their rather special flavors at the foot of the funicular going to Petrin Hill. Of course they serve the classics like strawberry, chocolate and salted caramel but you'll also find olive, basil, parmesan and even rice gelato ready for you to try out. I played it safe with tiramisu and stracciatella with big chunks of chocolate but if you're more of a daredevil than I am, this is the place to go.

LOCATION? Rytířská 27 & Újezd 24 in Staré Město
HOW TO GET THERE? Take tram 22 to Újezd (for the shop at Petrin Hill)

3. Zmrzlinar


One word: vanilla. While you'll find plenty of flavor options at Zmrzlinář, their vanilla ice cream is the one you don't wanna miss out on! I also highly recommend their cinnamon flavor and the pistachio was Rens' personal favorite. Also nice to know: Zmrzlinář is derived from the word 'zmrlina', which is Czech for ice cream!

LOCATION? Slezská 15 in Vinohrady  
HOW TO GET THERE? Take metro line A to Náměstí Míru, it’s just a 5 minute walk from there!


Hope you enjoyed this little post!

Prague photo diary

27 July 2016


 As you may know if you follow me on Instagram, I went on a city trip to Prague last week. After falling in love with Budapest two years ago, I was sure this was gonna be my cup of tea as well. In fact, Prague seemed even more impressive and vivid, though that may have to do with it being summer and not the midst of February. 

We spent our time exploring Josefov (the Jewish quarter), the Old Town, Prague Castle and Petrin Hill. My favorite was definitely the Staré Město or Old Town where we went up the Astronomical Clock Tower for an amazing view of The Church of Our Lady Before Týn and the Old Town Square. Across the bridge I was also impressed by Prague Castle and the amazing
Gothic architecture of the St. Vitus Cathedral. 

This trip has definitely hit me with the travel bug again and I can't wait to be off to a new destination. Next up is Gdańsk in Poland, which promises to be just as colorful as Prague. I guess I seem to be drawn to these types of places.

Have you ever been to the Czech capital?
What was your favorite part?


1. The Church of Our Lady Before Týn - 2. The Old Town Square - 3. The Astronomical Clock - 4. Trdelník - 5. Golden Lane - 6. Malá Strana - 7. The Lennon Wall - 8. Me in Vinohrady - 9. View of the old town from the Astronomical Clock Tower - 10. View from Prague Castle

Lovebirds in Bruges

12 May 2016


Oh Bruges, how dreamy you are! Rens and I spent last Sunday - which felt like a summer day! - playing tourist in Belgium's most romantic city of all. We met its beautiful swans, walked along its charming streets and even made a boat trip on its canals. I often complain about living in a country so small and insignificant but when I'm in Bruges I feel like I'm in a different place entirely. Sometimes all you need is somewhere to escape to!

Fitting the context, I wore a bright teal dress by Sugarhill Boutique with the sweetest lovebird print. It's so light and airy and I love the 3/4 sleeves.

 Have you ever been to Bruges?
Happy Thursday!


Dress: Sugarhill Boutique via ASOS - Bag: Mint & Berry via Zalando - Shoes: Boohoo

Lemon raspberry madeleines

25 April 2016


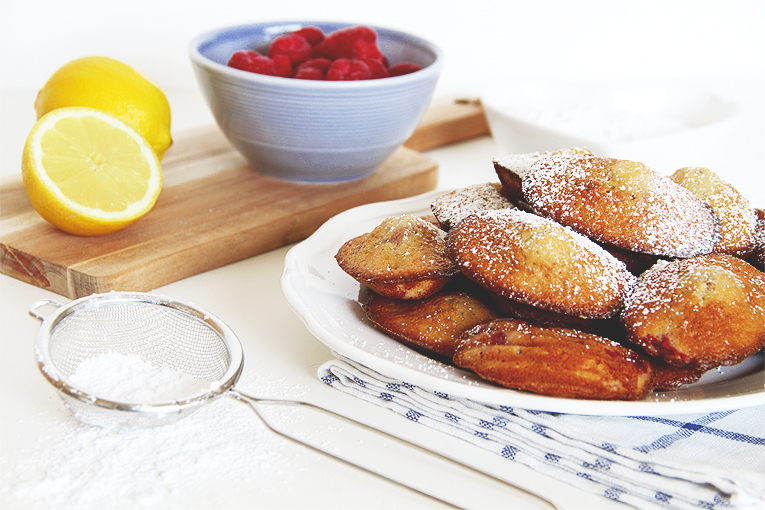
Introducing you to my latest baking obsession: madeleines. Classic recipes for these delightful French sponge cakes usually include a little bit of lemon zest and for this more lemony variation I used the zest of a whole lemon in addition to a handful of raspberries as I think those flavors really compliment each other. Aside from the extras, this is a pretty simple batter. All you really need is a madeleine pan to get that characteristic shell shape and you're ready to get baking!


Preparing the batter:
1. Beat the eggs and sugar until light and foamy.
2. Add the flour, vanilla sugar and baking powder and mix until smooth.
3. Melt the butter and add it to the mixture.
4. Add a tablespoon of honey and the zest of one lemon.
5. Cut up the raspberries and add them to the mixture.
6. Leave the batter in the fridge for about 30 minutes.


Baking the madeleines:
1. While the batter is refrigerating, butter and flour your madeleine pan.
2. Preheat the oven to 190 degrees.
3. Fill each well in the pan with one tablespoon of batter.
4. Place the pan in the oven and bake for 10-12 minutes until golden brown and a little puffed up in the middle.
5. Allow the madeleines to cool on a wire rack and dust them with powdered sugar.
6. You'll get 24 madeleines from this recipe so you can either bake one batch and then refill the pan (don't forget to rebutter it as well!) or you can bake them all together if you have two pans.


Once baked (and cooled!), these darlings will last for about a week in an airtight container. So you can easily bake your madeleines ahead to enjoy them at a spring picnic or simply at teatime!

Have you made madeleines before?
Do share your experiences or tips below!

Hey there, honeybee

12 April 2016


So, this weekend I unintentionally dressed like a honeybee! I love combining a pinafore dress with a striped top and since it's still no 'bare-legs-weather' I added some colored tights to make it a bit more quirky. Colorful or textured tights are one of my favorite ways to make a look more interesting.

Still I'm looking forward to leaving tights behind and despite the temperatures, spring is totally happening right now. How beautiful is this row of blossoming trees? I'm honestly so happy winter is over, I've been feeling much more inspired and energized lately. It's funny what a little bit of sunshine and tulips in people's front yards can do!

Enjoy the rest of your week!


Top: H&M - Dress: Boohoo - Bag: Primark

DIY: patterned flower pots

23 March 2016


Like everyone else I've fallen for the succulent trend. They're majorly cute, easy to take care of and for me it's also a bit of a nostalgic thing because I remember we used to keep some in our old apartment when I was a kid. Since I've been collecting these little plants, I haven't been able to find many flower pots for them that I like. So I got myself some plain white ones and made a small DIY project out of them! After all spring is the season to refresh your interior and add new elements to it, right?   

Here's what I used:


3 simple steps:

1. First think of a pattern to use - for inspiration you can always look up "patterns" in Google or Pinterest. My personal favorite and the easiest one to do by hand is a dotty pattern.
2. Next, draw your chosen design on a flower pot in pencil to avoid mistakes.
3. Finish your pattern with a permanent marker and let dry for a while.

Tip: If you should make a mistake, you may try erasing the permanent marker with nail polish remover. The pots I used are made out of bamboo but I think this trick should work on any type of varnished pots.


I know this is basically the easiest DIY ever but it's a great way to recycle old flower pots or add a personal touch to new ones. I got mine at a Dutch shop called Hema, but you can find similar ones (and succulents/cacti too) at Ikea. To keep it minimal, I used a black marker but you can of course use any color you like - silver or golden patterns could also be nice. That's the fun part, you can go any direction you choose with this. Let your creativity run wild! 

Happy DIY-ing & happy Spring to you all!

Polka dots + denim skirt

16 March 2016


This weekend was so lovely, it feels like spring has officially arrived. Though it was still a bit chilly to go out without a coat, I was really excited to finally shoot a new outfit post. We took these photos with the new 50mm lens I got for my birthday and I'm quite happy with how they turned out. The quality seems better I think?

Now for my outfit, I went for a pretty classic look. I love the versatility of an A-line denim skirt, you can wear it with almost anything! This time I combined it with a polka dot blouse and mint accents. I'm so done with winter-y colors, bring on the pastels!

Are you in a spring mood yet?
Have a lovely week!


Blouse: H&M - Skirt: UO - Handbag: Mint & Berry via Zalando

Easter sugar cookies

11 March 2016


I've really been into baking lately and with Easter coming up I thought it'd be fun to make some themed sugar cookies. They make a cute addition to your Easter brunch table or can serve as a personal gift to family or friends. The recipe is easy but the cookie dough does need at least 1 hour in the fridge, so be sure you have some time to spare before getting started (or you can also prepare the dough the night before). Here we go!


Preparing the dough:

1. Make sure the egg & butter are at room temperature. 
2. You’ll need two medium bowls. In the first one, beat the butter with a handheld or stand mixer until smooth. 
3. Add the sugar and beat on high speed for about 3 minutes. 
4. Add the egg and beat until fully combined. 
5. In the second bowl, whisk the flour, vanilla sugar, baking powder and salt together. 
6. Slowly add the flour mixture to the first bowl and continue mixing until combined. 
7. Time to use your hands! Scrape the dough together and shape it into a nice ball. 
8. Cover the dough with some plastic wrap and refrigerate for at least 1 hour to allow the butter to cool down. 


Making the cookies: 

9. Once chilled, roll out the dough on a floured surface to about 5mm thickness.
10. Prepare a baking sheet with parchment paper.
11. Use a cookie cutter to cut the dough into shapes and place them on the prepared baking sheet.
12. Re-roll the remaining dough using flour as needed and continue cutting until there’s no dough left.

Note: The amount of cookies you’ll get depends on the size of the cookie cutters. Most of the time I get around 14 to 15 cookies from this recipe. 


Baking & decorating:

13. Bake in a preheated oven at 180°C for about 10 minutes.
14. Once baked, place the cookies on a wire rack and allow them to cool completely.
15. Decorate the cookies however you like using icing and sugar sprinkles.


The decorating part is probably my favorite because you can really be creative with it. For these Easter themed cookies I used white icing and added a tiny bit of yellow color to half of it to get a nice pastel yellow. You can also just skip the icing and eat them plain. Personally I prefer them right out of the oven with a glass of warm milk.

Let me know how they work out for you!
Enjoy the weekend!